


The kitchen is one place in the home that has to store and keep a lot of materials and objects. While this is the case, a crowded and cramped kitchen is not healthy and can also pose a safety hazard. Here is a way to clear the clutter and make some extra space in the kitchen, all on your own. With your carpentry skills and armed with this tutorial, you can make your own kitchen cart for extra storage.
Difficulty level
This project is graded âModerateâ because it requires a certain level of carpentry skills.
Time Taken
The whole project will take about an hour and a half.
Things Required
1. 4â³ X 4â³ wood blocks ( teak or cedar or any other water proof wood)
2. 2â³ X 2â³ wood blocks
3. ½ inches thick plywood sheet
4. Pencil
5. Measuring tape
6. Wood bonding glue
7. Hammer
8. Screwdriver (preferably an electric one)
9. Screws (5/8 inches)
10. Nails
11. Sandpaper
12. Paint
13. Varnish
14. A board to cover the top of plywood
15. Four wheels (optional)
Process
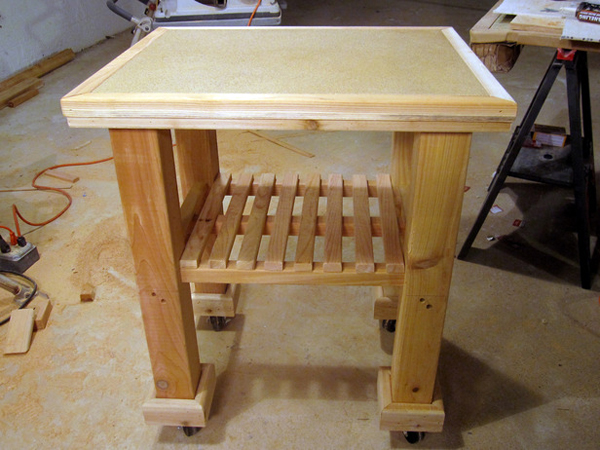
1. Use the 4 inches by 4 inches wood blocks for the legs. Plan the length of the legs you need based on the size of the kitchen cart you want to make. This will depend on the height of the cart that you need. Cut out four such legs overall for the cart.
2. Place the sheet of plywood, with the face that will become the future top surface, facing down. Place the legs about half an inch away from each corner of the plywood sheet and trace out, with a pencil, the position of the legs.
3. Use the 2â³ X 2â³ wood blocks to cut out four leg supports.
4. Apply liberal amounts of wood glue to the edges of the supports that have been cut out. Attach these supports to the legs somewhere at the halfway mark over the entire length of the legs. Use nails or screws to give added support to the supports.
5. Apply the wood glue now to the edge of the legs. Plant the legs over the traced portion of the plywood. Use the nails and/or screws to firmly attach the legs to the table top.
6. Using the same 2â³ X 2â³ wood block, make a center support which will be the same length of the leg supports. The center support too should be secured using wood glue and the screws and/or nails.
7. Place the top of your kitchen cart firmly and securely. Use wood glue and screws to aid this.
8. Use moderate amounts of glue in the center and on the edges of the plywood top. Place the board over the plywood top and allow it to dry.
9. Sand all the parts of the cart so that it is completely smooth. Once it is smooth, varnish and paints it with colors of your choice, according to the finish you desire. Your own kitchen cart is now ready.
Quick Tips
1. Use measuring tape to get exact lengths while cutting out the legs.
2. Used correct measures from the edges of the plywood sheet while tracing out the legs on the plywood sheet so that the legs are symmetrical in the final product.
3. Use the tape again to get the correct height for fixing the bases.
4. You can also add wheels to the legs for mobility of your kitchen cart.
5. Let the board on the plywood top dry for at least half an hour before you start the sandpapering process.
6. Add additional shelves to the cart if you require additional storage space.
Frequently Asked Questions
1) It is mentioned that I should use nails and screws for added support. Are both needed? Can I use only nails? What is the advantage of one over the other?
Ans: Nails and screws are both ways of fixing things firmly. The screw requires some skill to fix but anything that is screwed in can be removed later. A nail is easy to use – place it at the spot and hammer it in! But once you have firmly nailed something in, it is difficult to undo it without damaging the wood to some extent at least. So use your discretion and make this choice between ease and comfortable access.
2) How many nails and screws must I use while fixing the legs to the sheet?
Ans: This depends on how strong the glue bonds and how well the nails/screws are holding. But typically, about four nails/screws per leg must do the trick.
Things to watch out for
a) Be careful about the wood splinters as you work. These cause deep wounds if one is not careful.
b) If you are doing a carpentry project for the first time, be careful while hammering nails. A mistaken blow to the fingers or hand can result in painful swellings.
c) When you apply varnish and paint to the kitchen cart, do it in an open space which is well ventilated because the chemical odors that arise might cause irritation.
d) Seek help (from a neighbor or carpenter) if in any doubt or difficulty.